Microsoft has ended support for the browser (or browser mode) you are using. SHI is ending support for all browsers older than IE9 effective Monday August 12, 2019.
More information can be found on our website and from Microsoft.
Your browser is no longer supported
Microsoft has ended support for the browser (or browser mode) you are using. SHI is ending support for all browsers older than IE9 effective Monday August 12, 2019.
Below is a list of issues that many SHI.com customers may encounter. Click on a topic below to expand the section and view the support content.
Account Management
SHI.com is a business-to-business (B2B) sales company. That means that our goal is to provide products and services to other organizations, not to individual consumers. We typically do business with any
customers with ~250 employees or more. If you are a small business owner and have questions, reach out to Corp_SmallBusiness@shi.com.
If your organization would like to become an SHI customer, the best way to get started is to contact us by phone or our Contact Us page so we can setup
your organization’s account. Your account team will then help configure SHI.com for your organization and address any other questions you may have.
Call us at (888) 764-8888 or via our Contact Us page today!
You cannot create a SHI.com account without a SHI.com Token & Key! New customers should reach out via phone (888-764-8888) or via our Contact Us form. Existing customers
should contact their Sales Team if they do not know their SHI.com token and key.
1
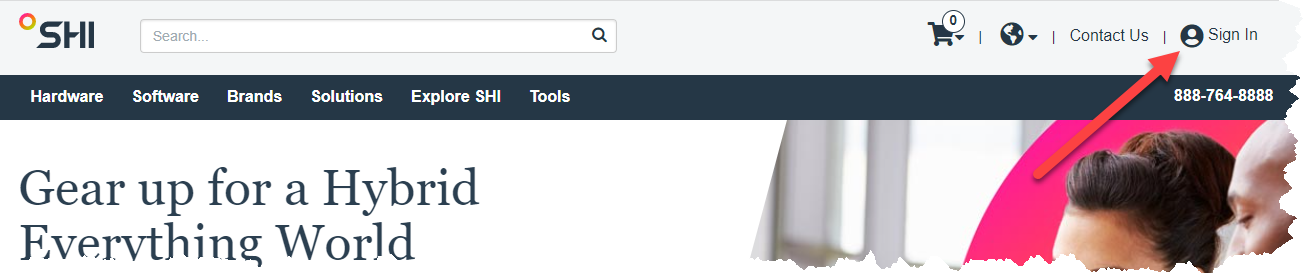
Navigate to SHI.com, click Sign In in the top right corner, and sign into your account.
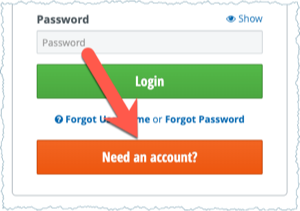
2
Click the orange Need an Account button towards the bottom.
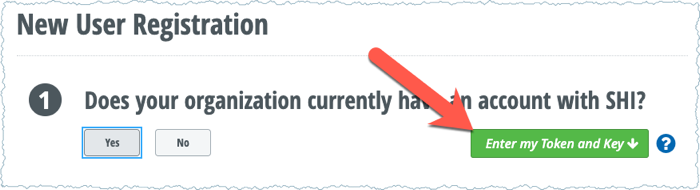
3
Click the green Enter my Token and Key button on the right to jump to entering your token/key.
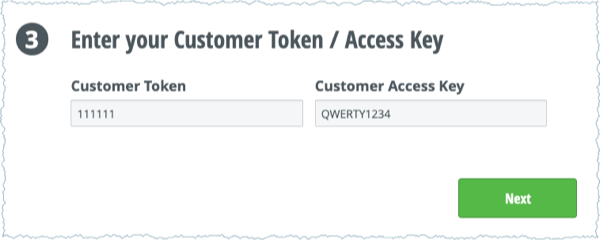
4
Input your token and key and then click the green Next button at the bottom of the page.
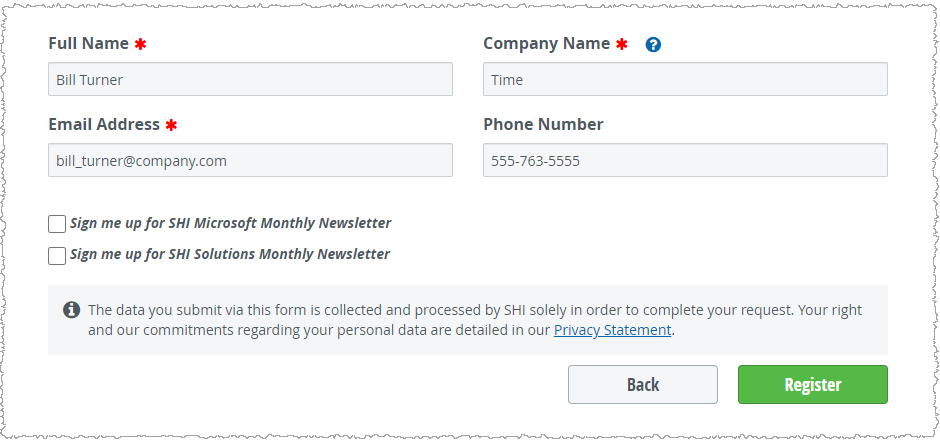
5
Fill out the remainder of the form ensuring all required fields are completed and then click the green Register button at the bottom of the page.
6
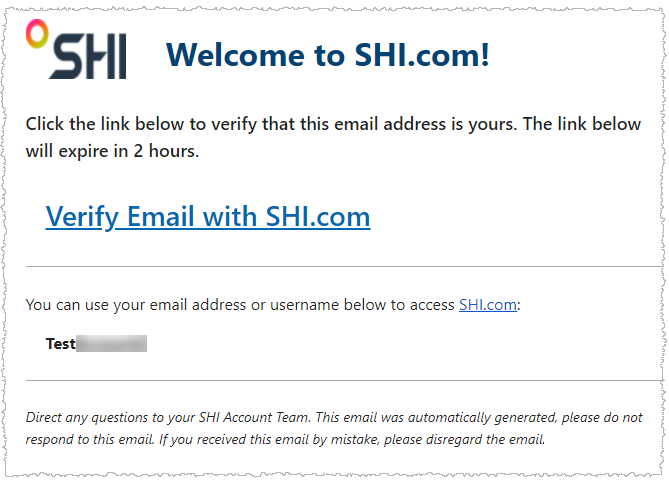
To finalize this process, please check your email and confirm your account by clicking the link in the email from SHI.com.
7
Complete! You can now login with your new credentials.
The company token and access key are how we link all of your employee’s individual user accounts under one company account as well as provide customizations to your website experience. To do this, employees
simply need to use your organization’s company token and key during the SHI.com user account setup process.
1
Navigate to SHI.com, click Sign In in the top right corner, and sign into your account.
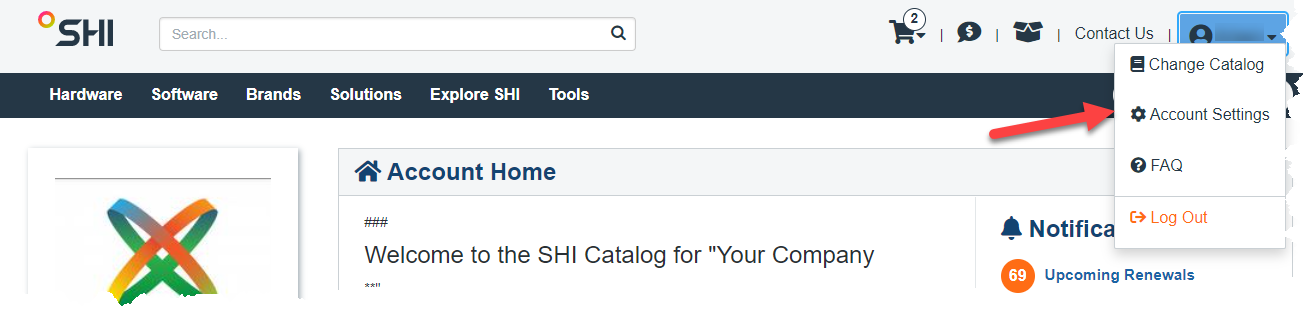
2
Click the account dropdown in the top right corner and then click Account Settings.
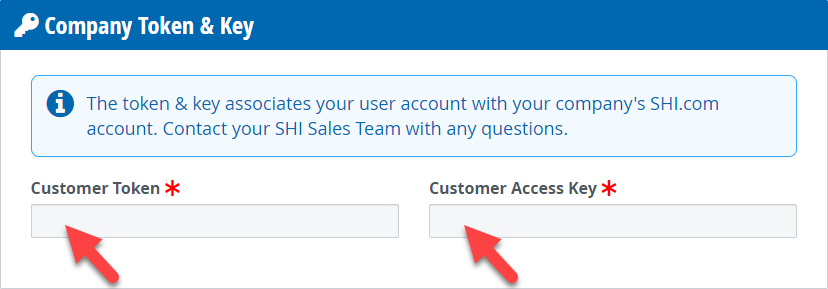
3
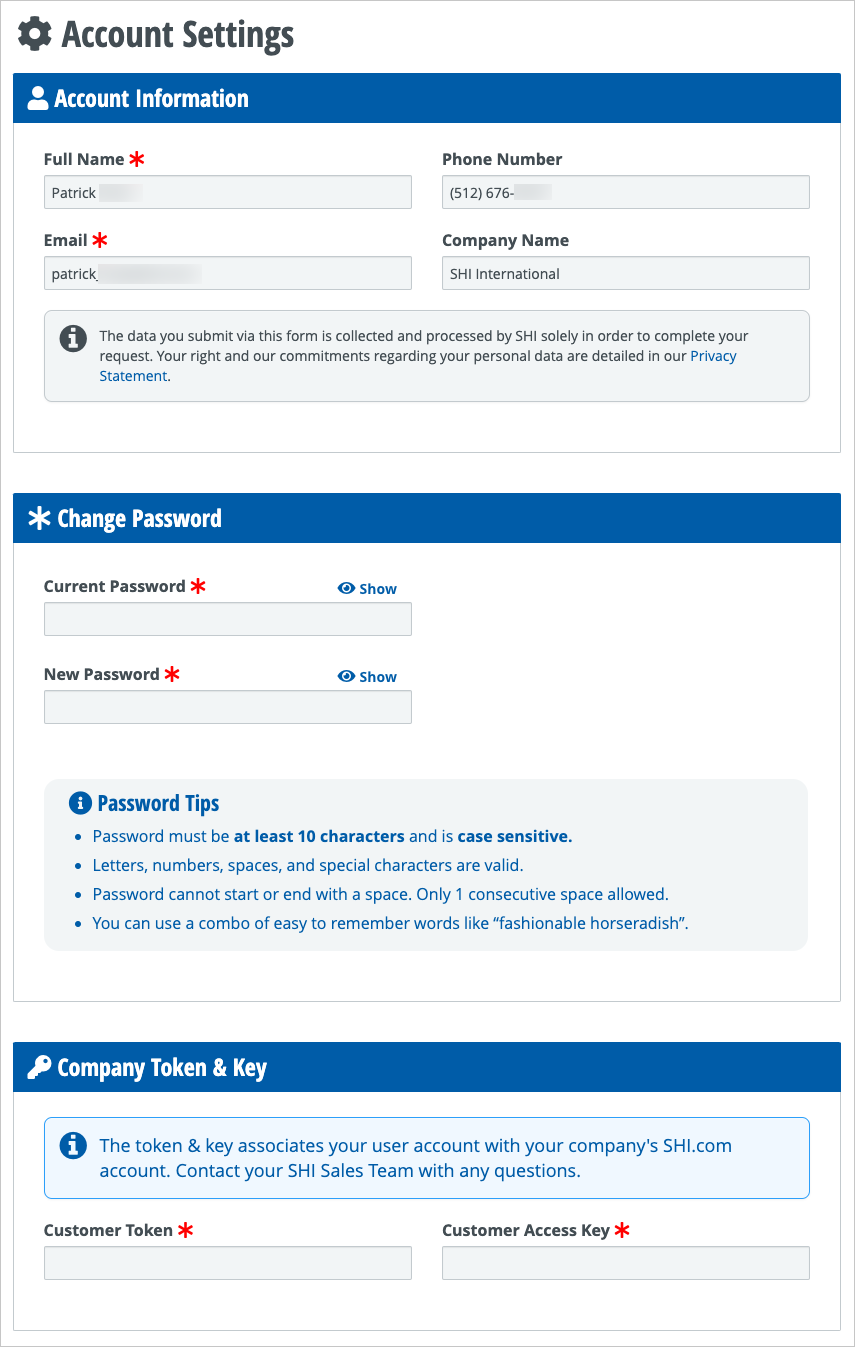
Scroll to Company Token & Key section then copy & paste your Customer Token & Access Key in the available input fields.
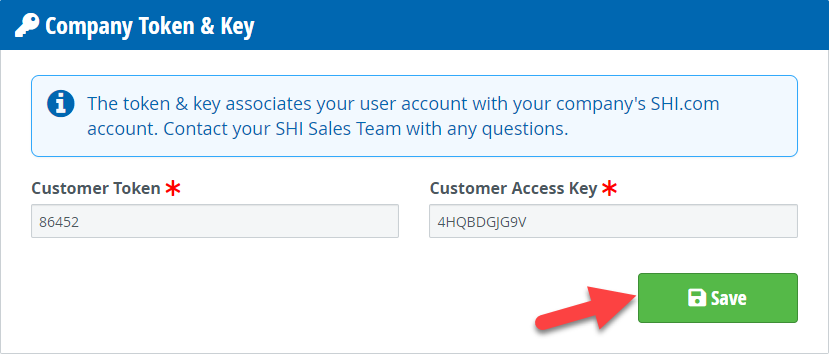
4
Once both input fields are filled, click the Save button. You should see a small banner confirming the change.
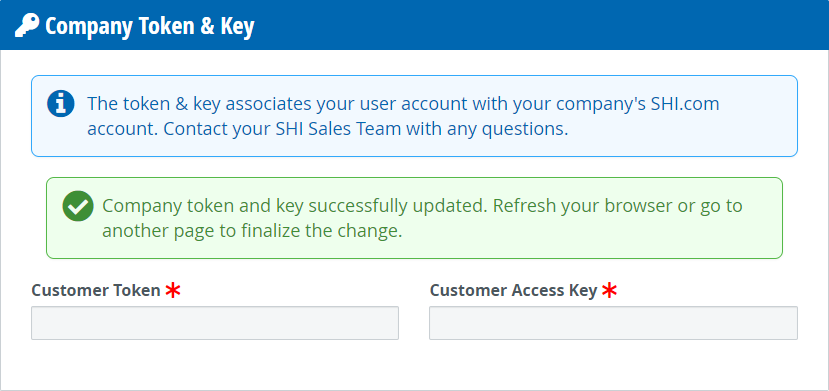
5
Token and key change complete! You will need to refresh your browser or navigate to a new page to see any changes.
1
Navigate to SHI.com, click Sign In in the top right corner, and sign into your account.
2
Click your name to open the dropdown menu and then click Account Settings.
3
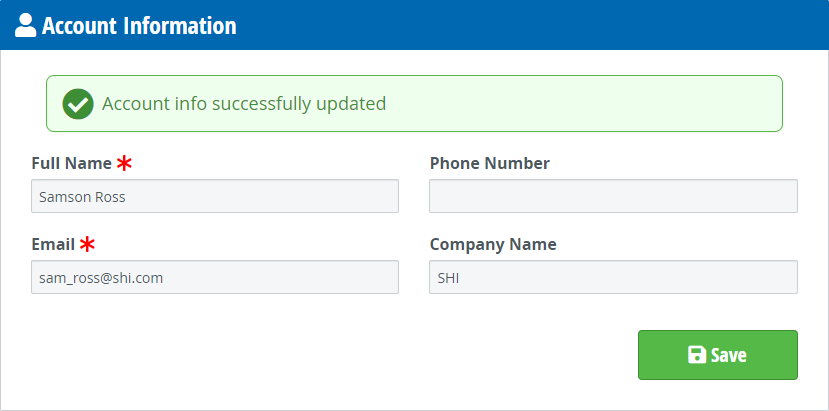
Once on the Account Settings page you can edit your contact information, change your password, or adjust your company token & key.
4
To change any of your account information go to the respective section on the page and make the adjustments.
Note that if you change your email address, it will need to be re-verified. A verification email will automatically be sent to you after submitting changes to your email address.
5
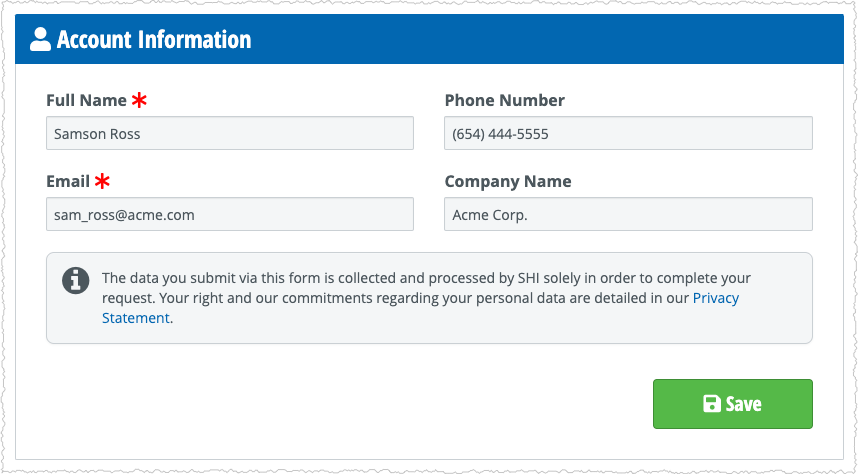
After changing any of your account info a Save button will appear.
6
Once the changes have been saved a confirmation banner will appear and the process is complete!
To provide SHI.com access to other employees/coworkers at your organization, your users will need:
Their own SHI.com user account.
The token and access key for your organization.
This Token/Key Setup tutorial video can be provided to any users that need guidance on creating and configuring their
SHI.com account. Note that there may be a different company token/key pair for admin users and regular purchasing accounts. Reach out to your SHI Account Team with any questions.
1
Navigate to SHI.com, click Sign In in the top right corner, and sign into your account.
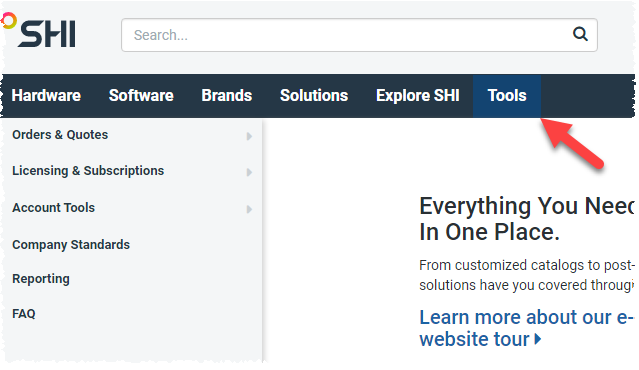
2
In the top navigation bar hover or click on Tools.
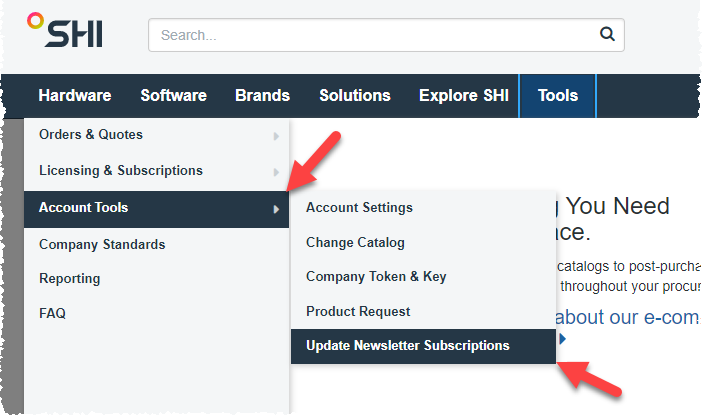
3
Next, hover over the entry Account Tools in the menu on the left. Then, select “Update Newsletter Subscriptions” from the menu that appears.
4
On the Newsletter Subscription Page start by selecting one of the three options for each newsletter.
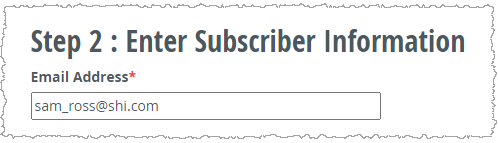
5
Next, you will need to enter the email address that you want to start/stop receiving the newsletters for.
6
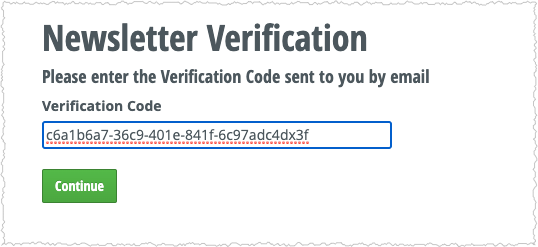
Next, click the Continue button at the bottom of the section. SHI will then automatically send an email with a verification code.
7
Copy the email verification code from the email, paste it into the input field shown, then click the Continue button.
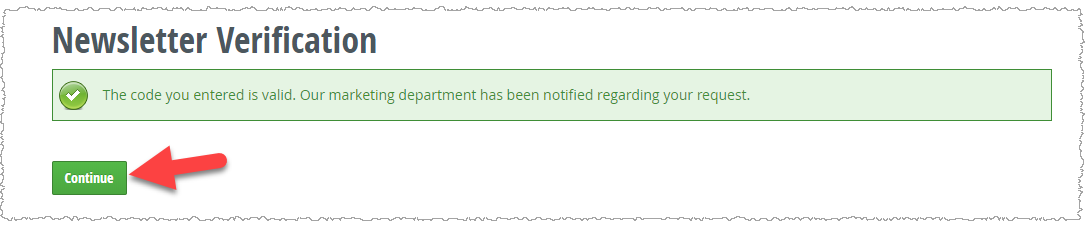
8
Once the code is received a banner will appear that confirms the change was made. Your newsletter subscriptions should now be updated!
By default a user sees their own quotes and quotes published to them by their Account Team. Based on their permissions, a user may see company level quotes and order history. These permissions are based on
how each company has configured their SHI.com company account
Shopping/Products
There are a variety of reasons why you might not be able to locate a product on SHI.com. Products may be unlisted/unavailable due to:
Your company has a customized catalog with only select products
Complex licensing requirements – let us help you select the right products
Pricing complexity – let us help you get the best price available
Manufacturer constraints/requirements
Data quality issues – try as we might, we don’t always have data that helps search
SHI.com Search performance – when searching, keep searches simple to get the broadest results
We do our best to ensure products are easily discoverable and are always adding in new products. If you don’t find what you’re looking for, contact you SHI Account Team to assist, as we most likely have the
product
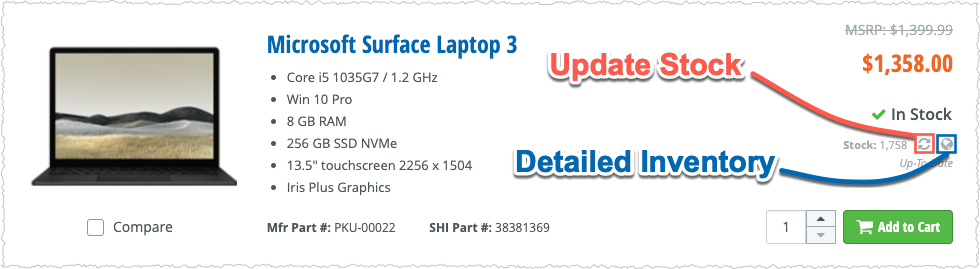
On SHI.com you can typically find stock information on the Search Results page, the Product Details page, or your Company Standards. The stock status for a product should be clearly stated as In Stock, Low
Stock, or Out of Stock. For many products you can even update the stock status immediately to see our current stock levels, or view Detailed Inventory to see which warehouses have stock. Note that not all products have real-time
inventory. See the screenshots below for two common locations of stock info on SHI.com.
Stock Buttons on Product Search Results
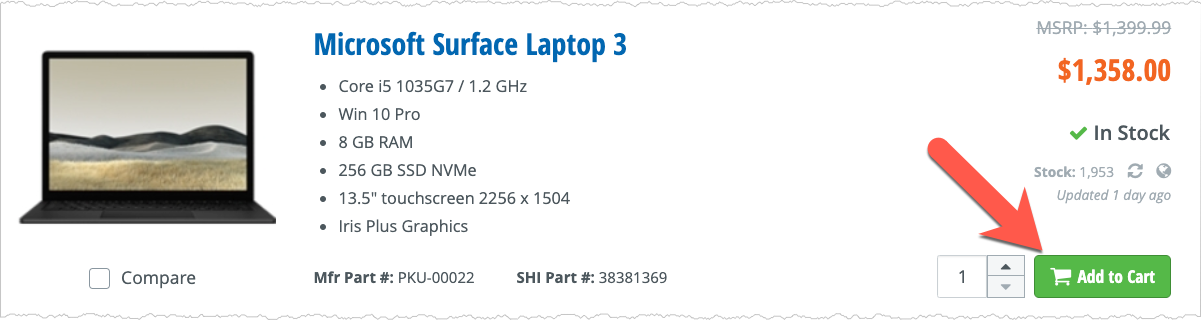
Stock Buttons on Product Details
Note that stock information may not always be accurate for a variety of reasons, such as:
Products are constantly being purchased, which causes stock values to fluctuate.
Technical limitations with some manufacturers/partners.
Although infrequent, system errors may cause incorrect values to display.
If you are uncertain about the availability of any product reach out to your SHI Account Team for assistance.
Products that display “Login for Price” simply require that the user sign in to be able to see pricing information. This ensures you see the price that’s specific to your account. Products that are displayed
as “Call for Quote” may have complicated licensing, pricing, or other technical constraints. The best way to explore these products further is to request a quote from your SHI Account Team.
Quotes
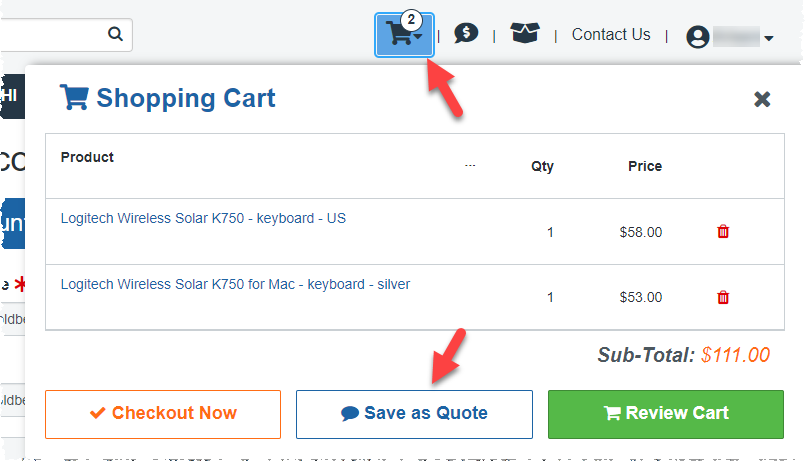
1
Navigate to SHI.com, click Sign In in the top right corner, and sign into your account.
2
Search for a product and then click Add to Cart.
3
Click the Shopping Cart button in the top navigation bar and then click Save as Quote.
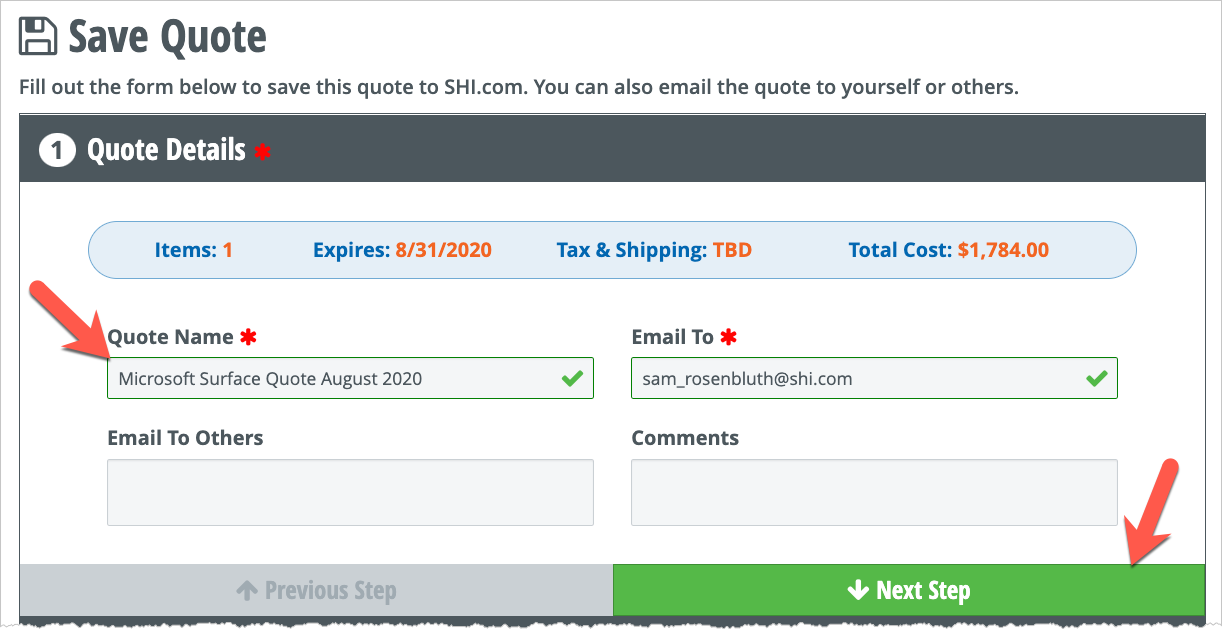
4
Type a Quote Name and then click the Next Step button.
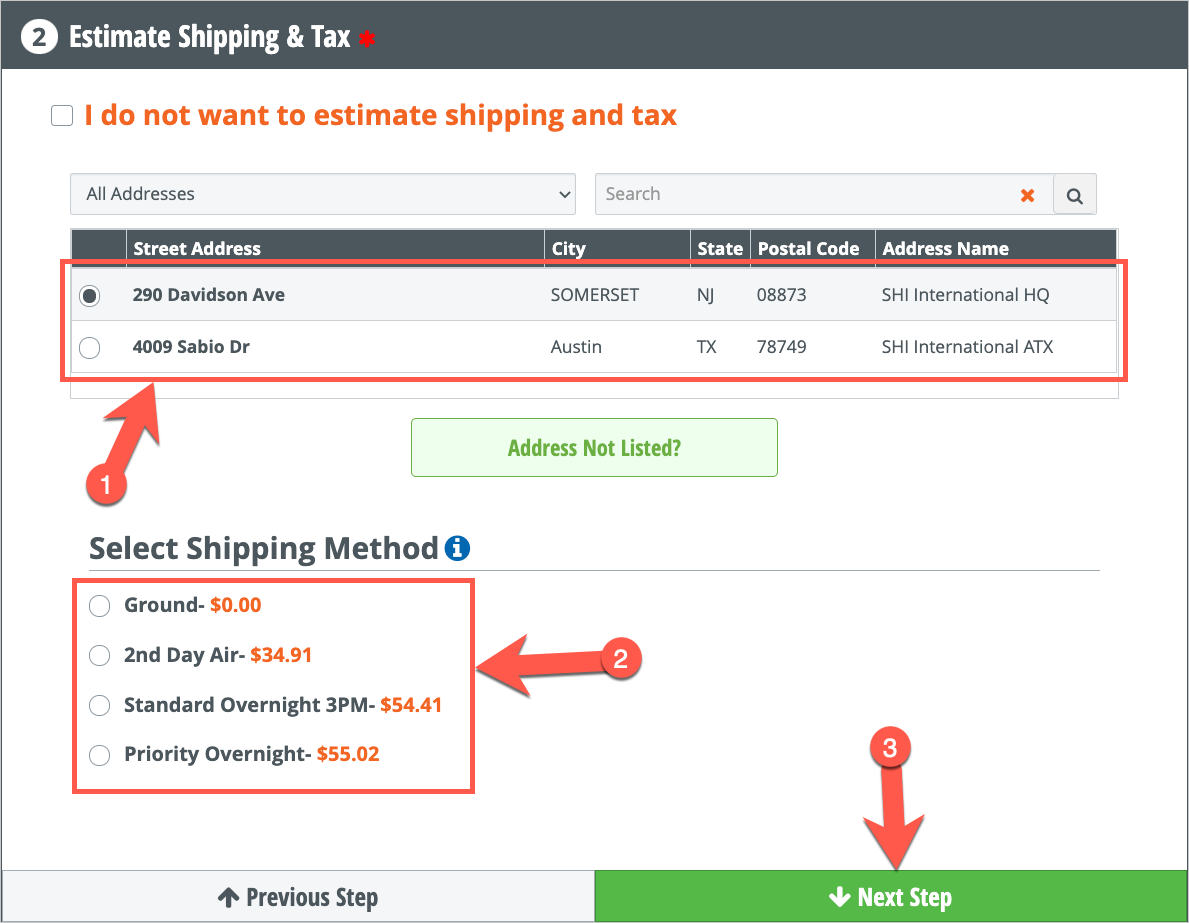
5
On Step 2, select a shipping address, a shipping method, and then click the Next Step button.
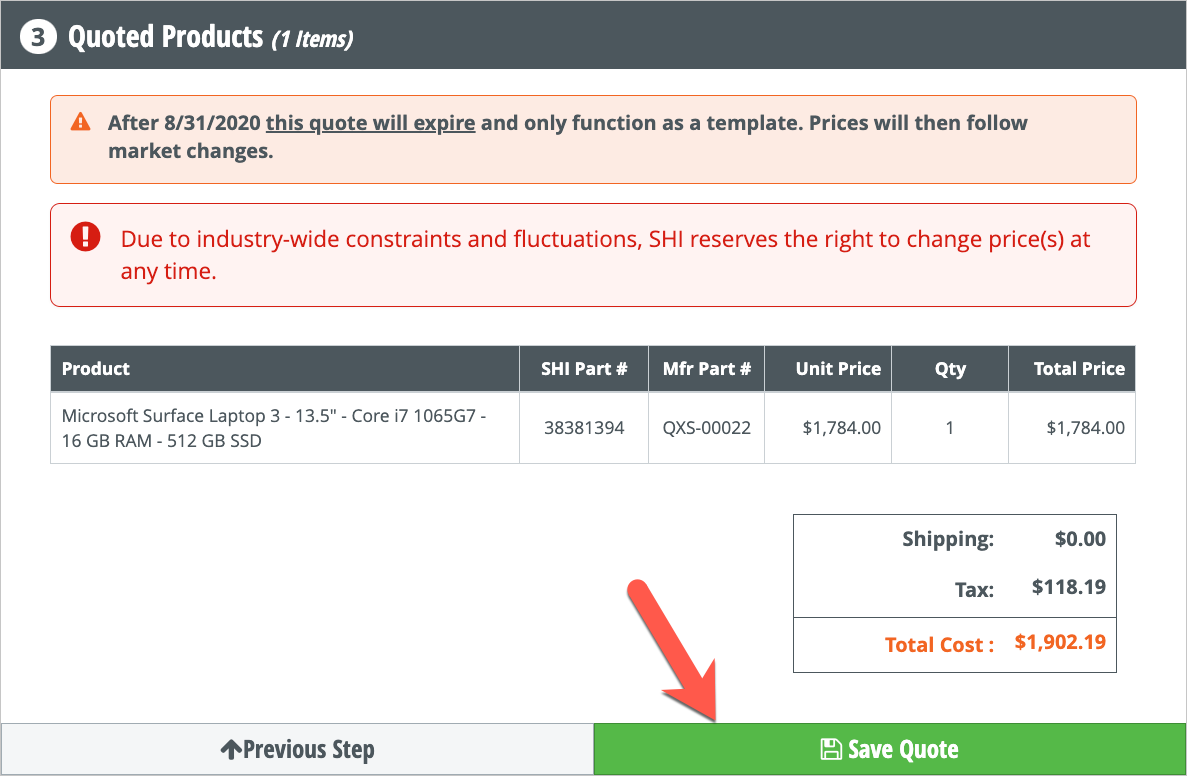
6
Review the products on the quote in Step #3 and then click the Save Quote button.
7
Your quote should now be created. Access the quote from the View Quotes page.
1
Navigate to SHI.com, click Sign In in the top right corner, and sign into your account.
2
Click the View Quotes button in the top right of the navigation bar.
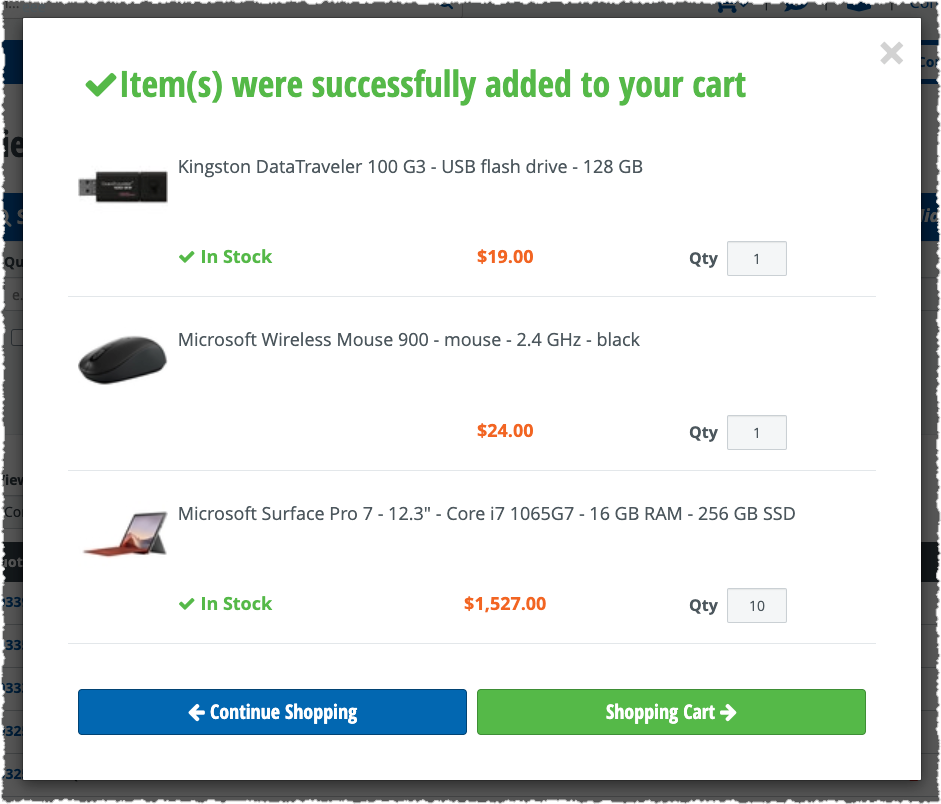
3
On the View Quotes page locate the desired quote and click the corresponding Add to Cart button.
You can add both active and expired quotes to your cart. However, pricing is subject to change on expired quotes. You will need to first navigate to the Quote Details before adding an expired quote to your
cart.
4
Confirm adding the quote to your cart by clicking the Add button on the confirmation popup.
5
A confirmation will appear that shows the items that were successfully added to your cart.
The price shown in a quote is only valid as long as the quote is active. Once a quote expires, the product will follow market pricing.
Typically, quotes are valid until the end of the month. For example, if the quote was created on January 15, 2020, the quote would expire on January 31, 2020. Once a quote has expired it can still be added to
your cart from the Quote Details page, but it will leverage the current market pricing for all items.
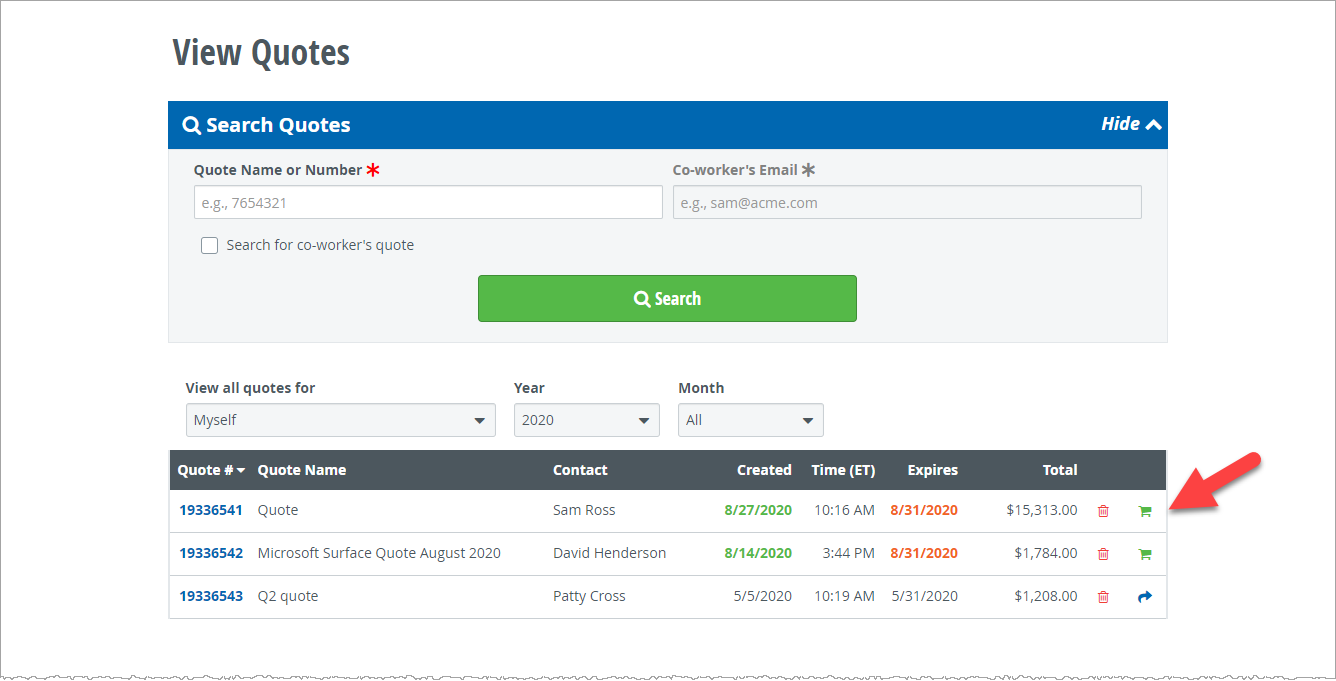
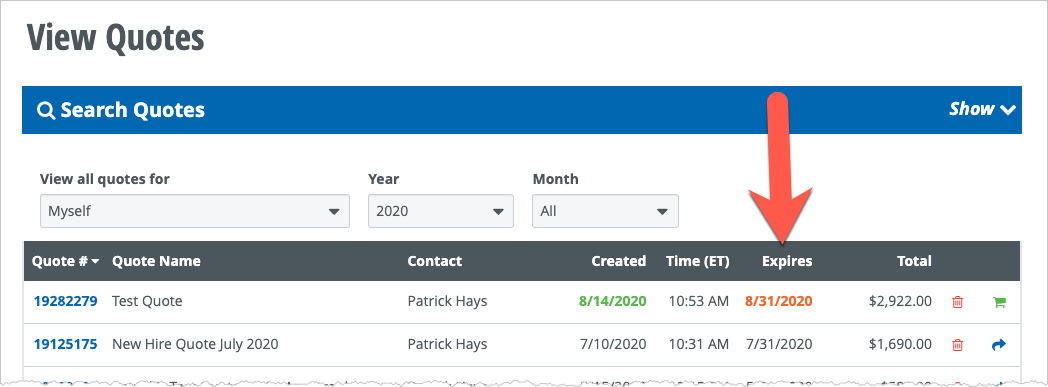
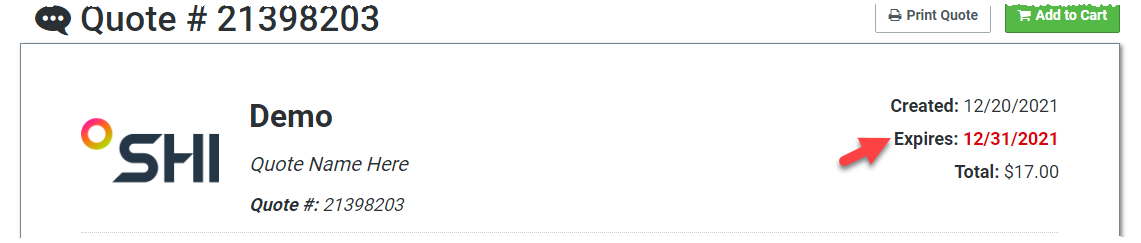
To determine when your quote will expire check either the View Quotes page or the Quote Details page as shown below. If you have any questions about possible alternatives for quote expirations or any other
issues, reach out to your SHI Account Team.
Quote Expiration on View Quotes
Quote Expiration on Quote Details
By default, you will be able to view all of your own quotes or quotes published to you. Additionally, certain users may have admin privileges that allow them to see quotes and orders across the entire
organization. Your organization decides who has admin privileges. Ask your SHI Account Team if you have any questions about admin access for your SHI.com company account.
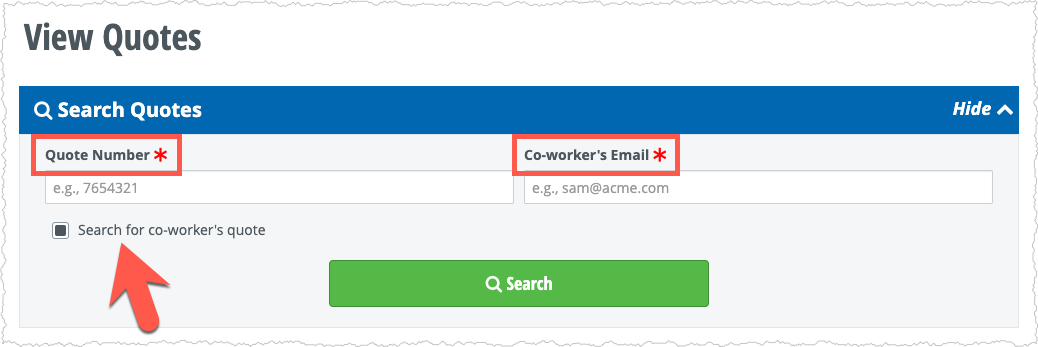
Quotes can also be accessed by anyone within your organization who has the quote number and email address of the original quote recipient, regardless of admin privileges. Note that you must have both the
quote number and the email address to be able to search for the quote. See screenshot below highlighting the ability to search for a coworker’s quote.
Orders
1
Navigate to SHI.com, click Sign In in the top right corner, and sign into your account.
2
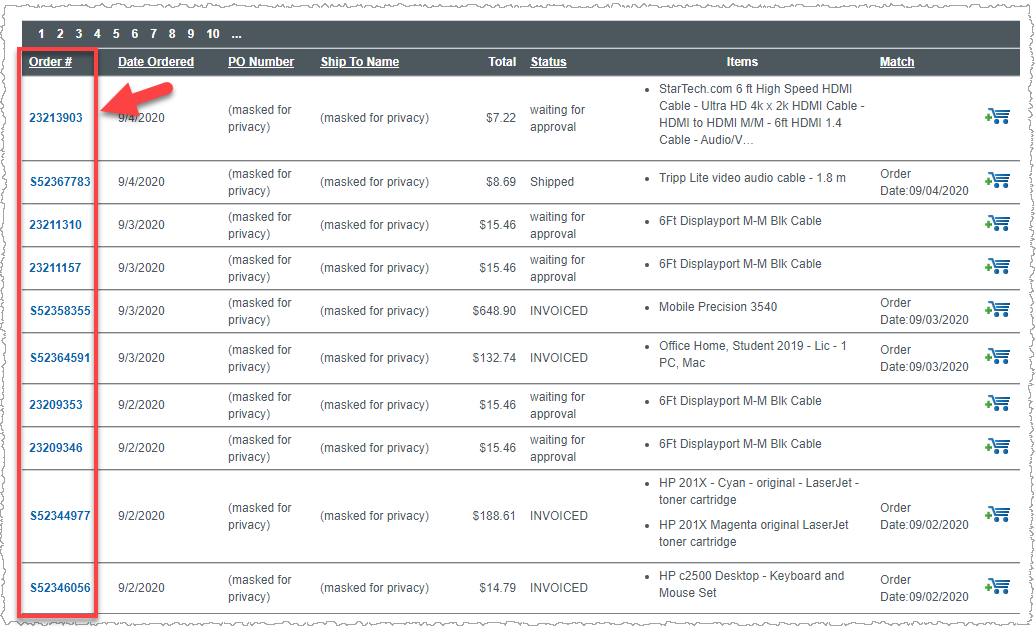
Once signed in click the Orders button in the top right corner.
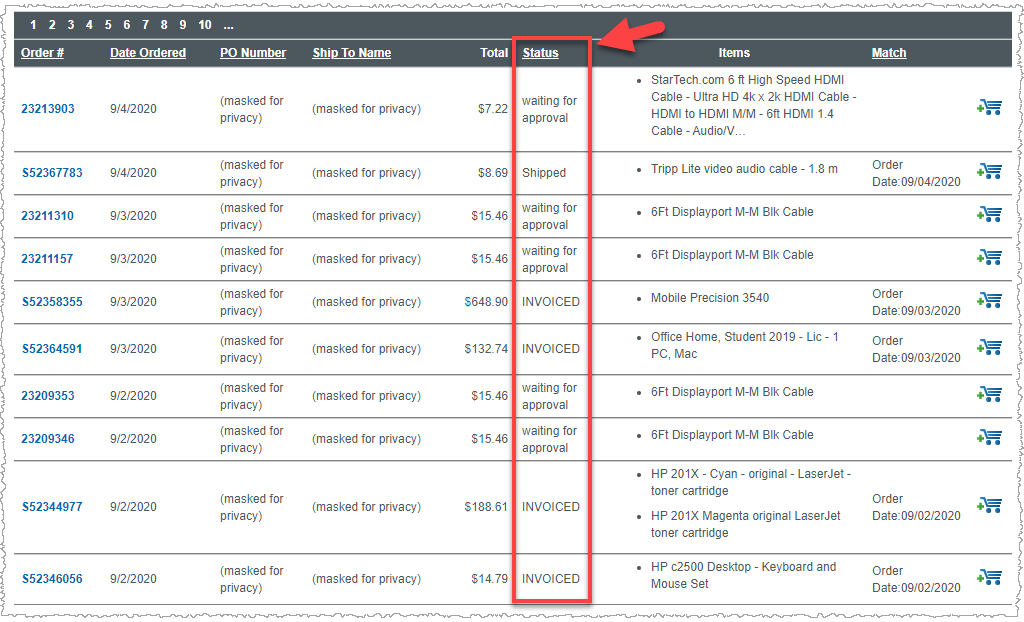
3
On the Order Search page, locate the status column. The status of your order is listed here.
4
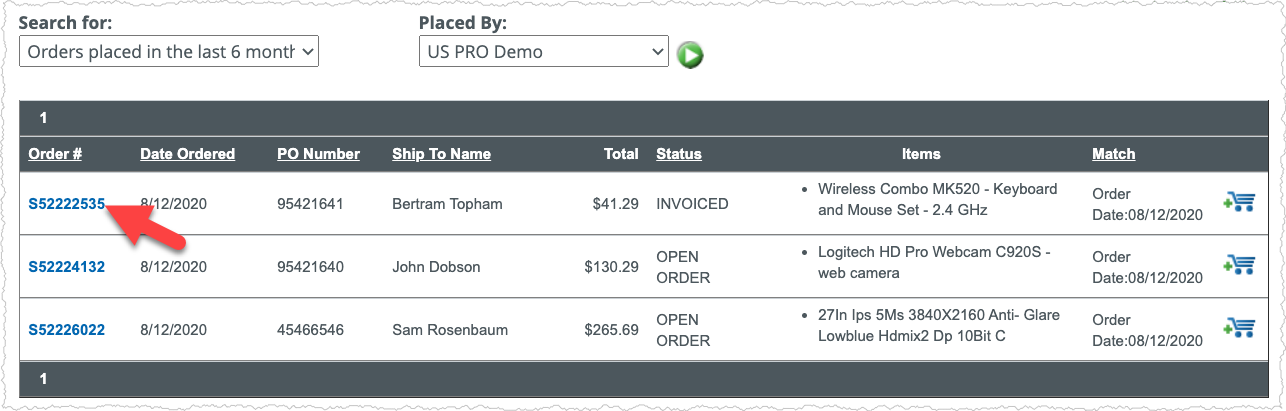
You can also click the Order number on the left to view the Order Details page.
Pending
The order was submitted on SHI.com but not yet processed.
Open Order
The order has been placed and received by SHI but has not yet shipped or been invoiced.
Shipped
The order has been shipped.
Invoiced
The order has been shipped and the customer invoice has been created.
Canceled
The order has been canceled.
Currently, you cannot cancel orders via SHI.com. Reach out to your SHI Sales Team as soon as possible if you need to cancel an order.
Yes, most products that are out of stock can still be ordered. However, these items will be “back-ordered” and will be shipped as soon as stock is available. You will not be billed until the order is shipped.
For any questions about available stock or other issues, check with your SHI Account Team.
The stock status of most items is easy to locate. You can refresh the stock status or view the detailed inventory for many
products. To update the stock status, click the refresh button on the search results or product details page. To view detailed inventory, click the globe icon on either the search results or product details pages. See screenshots
below for the location of these buttons.
Inventory Buttons on Search Results
Inventory Buttons on Product Details
Yes, SHI offers basic approval routing on SHI.com.
We have the ability to set limits so that any order above a specific threshold will need to be approved by a manager. For example, you could set your account so any orders under $500 do not need approval, while any
orders above $500 do need approval.
This feature needs to be turned on for your account. Please work with your SHI Account Team to add approval routing to your account.
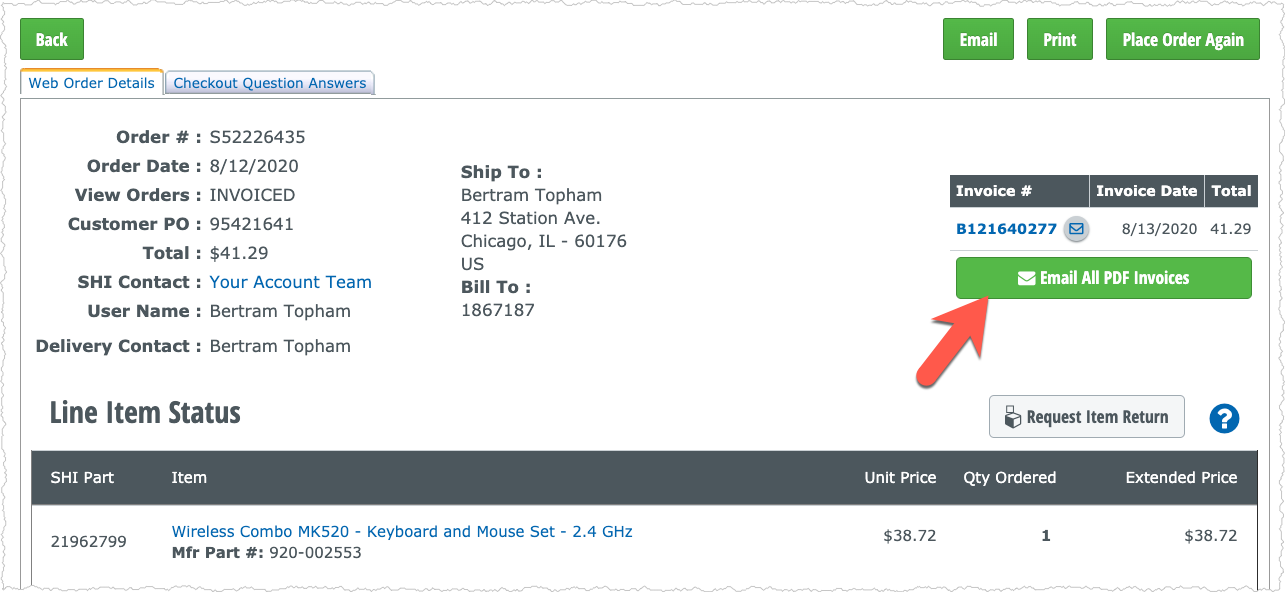
1
Navigate to SHI.com, click Sign In in the top right corner, and sign into your account.
2
Once signed in click the Orders button in the top right corner.
3
Locate the desired order and click the Order number link.
4
On the Order Detail page, click the Email All PDF Invoices button located on the right side OR click the individual email button
beside a specific invoice number.
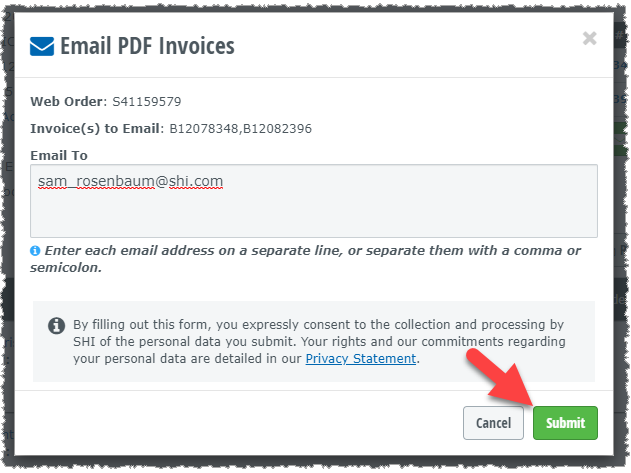
5
Once the Email PDF Invoices modal/window is shown, click the Submit button.
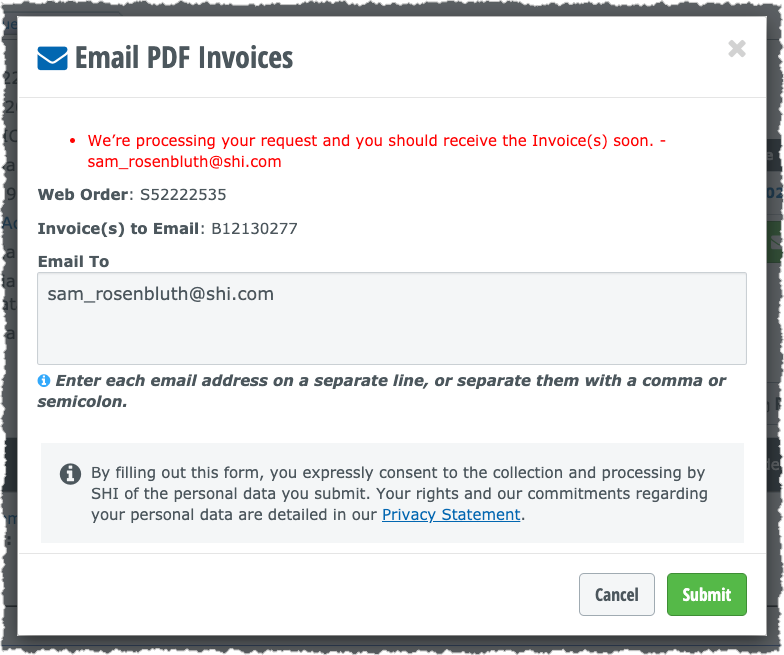
6
Complete! A banner will then confirm that the email will be sent to the listed address.
Payments
SHI’s typical payment options are:
Net Terms (typically Net30)
Visa
Mastercard
Discover (US only)
American Express (US only)
Check with your SHI Account Team regarding any questions on available payment options and setting up the right one for your organization
The PO number field is available in the first step of checkout. Simply input the PO number into the correct input field during checkout and that information will be available on the order details once the
order is placed. For other checkout customizations and settings please talk to your SHI Account Team
Shipping
Tracking information for your order can be found on the Order Details page for the order in question. Note that tracking information will not become available for your order until the order has been shipped.
Not all orders have tracking information (e.g., orders for software) depending on the logistics for each order. The screenshot below shows where you can find the shipping information on the Order Details page. Contact your SHI Account
Team with any questions.
Yes, we are able to pre-load a list of billing/shipping addresses into your account. Please reach out to your SHI Account Team to get your organization’s addresses added.
Availability of overnight shipping is determined by a number of factors such as: the time of day, product availability, product location, customer location, etc. During checkout you will be able to determine
if overnight shipping is available. If you have an active relationship with your SHI Account Team, please reach out to them to fulfil urgent overnight shipping orders. Be aware that selecting overnight shipping does not guarantee it
will be delivered the next day. This is true especially if you place an order on the weekend or after your regional shipping cut off time.
If you ever have a question about shipping, availability, and timing, reach
out to your SHI Account Team so we can do our best to ensure you receive your order as quickly as possible.
No, SHI.com does not currently accommodate shipping to multiple addresses on a single order. You will need to create a unique quote and/or order for each address you need to ship to.
Returns
Note that when you submit an RMA/return through SHI.com that you are submitting a return request. This means that the request may not be accepted due to manufacturer constraints, or other issues. See our
Return Policy for more information.
Eligibility for returns is typically determined by the product manufacturer, not by SHI. Many products are not eligible for returns because of manufacturer limitations. Keep in mind that return requirements are
subject to change and may even vary within a manufacturer’s product lines. Other product types may not be eligible for return because of the nature of the product (e.g., software, warranties, etc.).
Timing for when a return can be accepted is also different from manufacturer to manufacturer. Typically, items will need to be returned within 30-75 days of the purchase date to be eligible for return. Items that
have not yet been delivered are not yet eligible for return.
Returns/RMA requests are only available on SHI.com for US and Canadian customers. Reach out to your SHI Account Team if you have any questions or concerns about a product return or RMA.
When you submit an RMA on SHI.com you are only submitting a return request. This means that the request may not be accepted due to manufacturer constraints, or other issues. You can view our full Return Policy and contact your SHI Sales Team with any questions.
Your SHI Account Team should reach out to you within 48 hours (on business days) of the request to inform you whether we will be able to process the return. They will provide you with the next steps
and the timeline for completing the return.
Please note that this process is a return request. Your SHI Sales Team will contact you with more information once your request is submitted. Also note:
Most items can only be returned if they were purchased in the last 30-75 days.
Items that have not been delivered may not be available for return yet.
Some types of items (software, warranties, etc.) are not eligible for return via SHI.com.
You can view our full Return Policy and contact your SHI Sales Team with any questions.
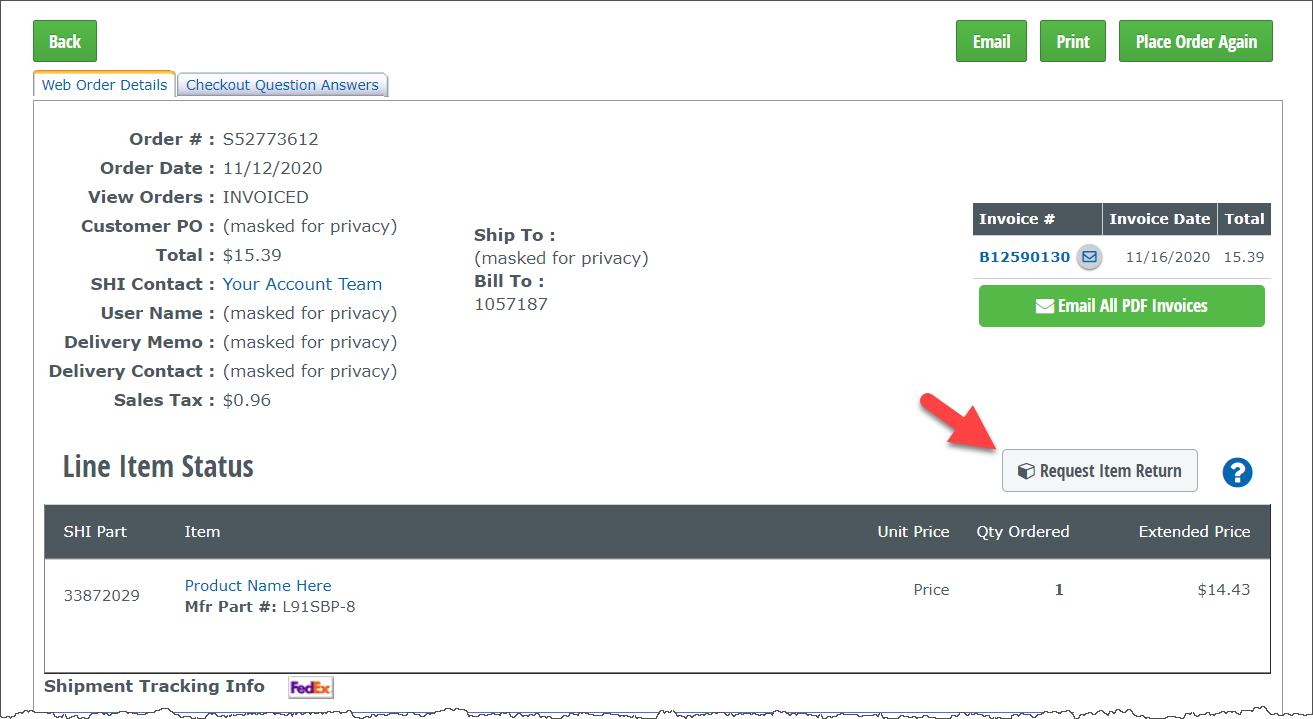
1
Navigate to SHI.com, click Sign In in the top right corner, and sign into your account.
2
Once signed in click the Orders button in the top right corner.
3
On the order page, click on the desired order number located on the left side.
4
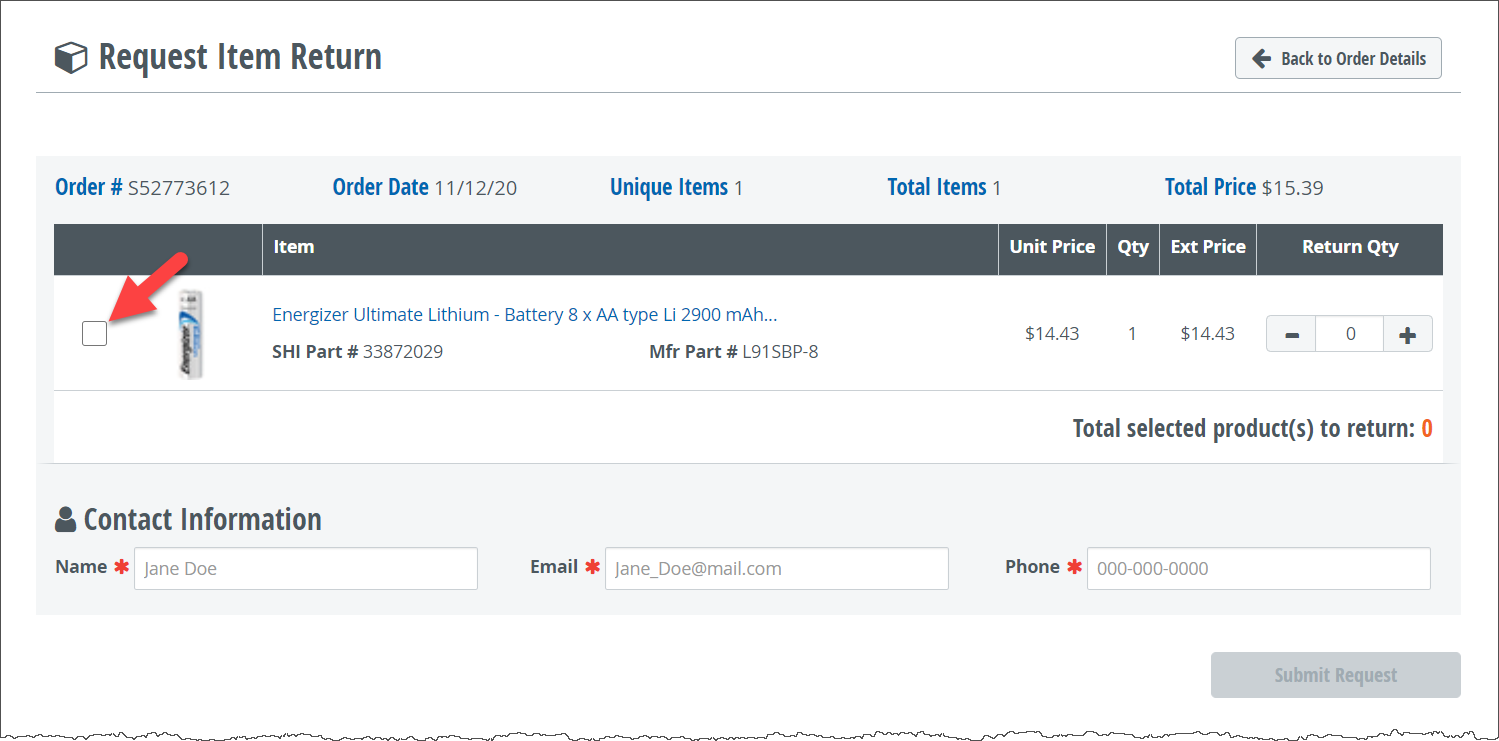
Once on the order detail page click the Request Item Return button.
5
Select Items to be returned. Please check the box located to the left of the product you wish to return.
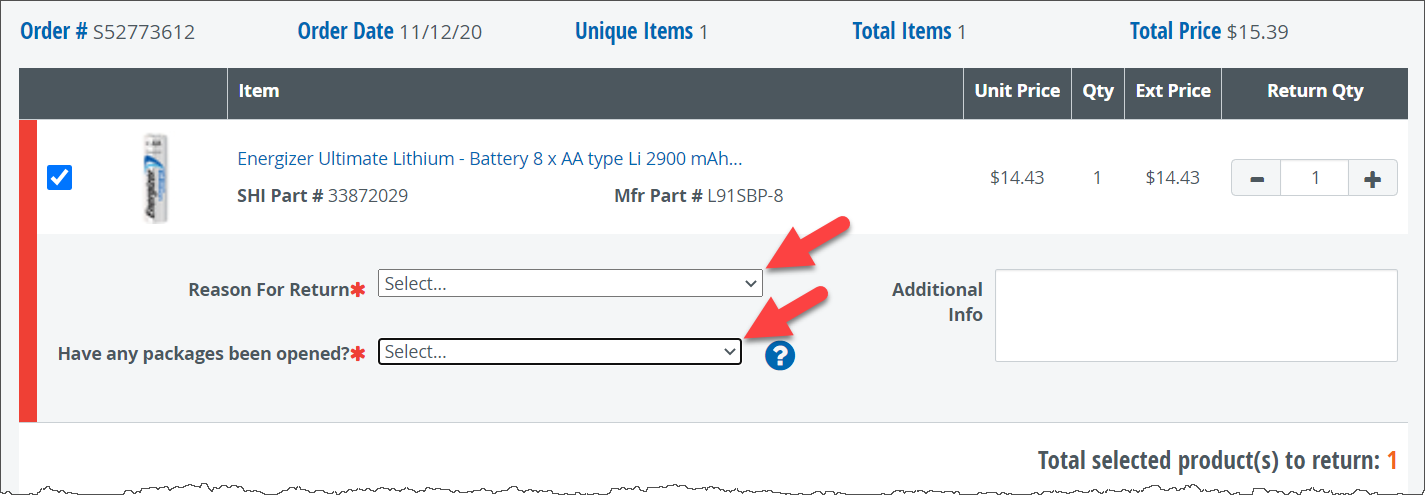
6
Select a return reason and indicate whether the product packaging has been opened. Optionally, include any additional notes in the Additional Info section.
7
Ensure your contact information is correct and then click the Submit Request button. Your return request should now be submitted. You will typically hear back from your Account Team whether the return is valid and what to do next within 48 hours (on business days).
Integration
SHI’s open architecture systems allow us to integrate with virtually any eCommerce platform, whether through market leaders or a proprietary solution. Ariba, Coupa, Perfect Commerce, SciQuest, PeopleSoft, SAP
and Oracle are the most popular applications supported by SHI. In general, SHI can support systems that use cXML (commerce extensible mark-up language), xCBL (XML common business library) or EDI (electronic data interchange) standards.
Because each implementation is different, someone on our EDI team will be your technical contact through the setup and testing process. We can support virtually any ecommerce tool that uses either the OCI Roundtrip
or cXML standard. You can view more information on our EDI page, or contact your SHI Account Team for more information on e-commerce integrations.
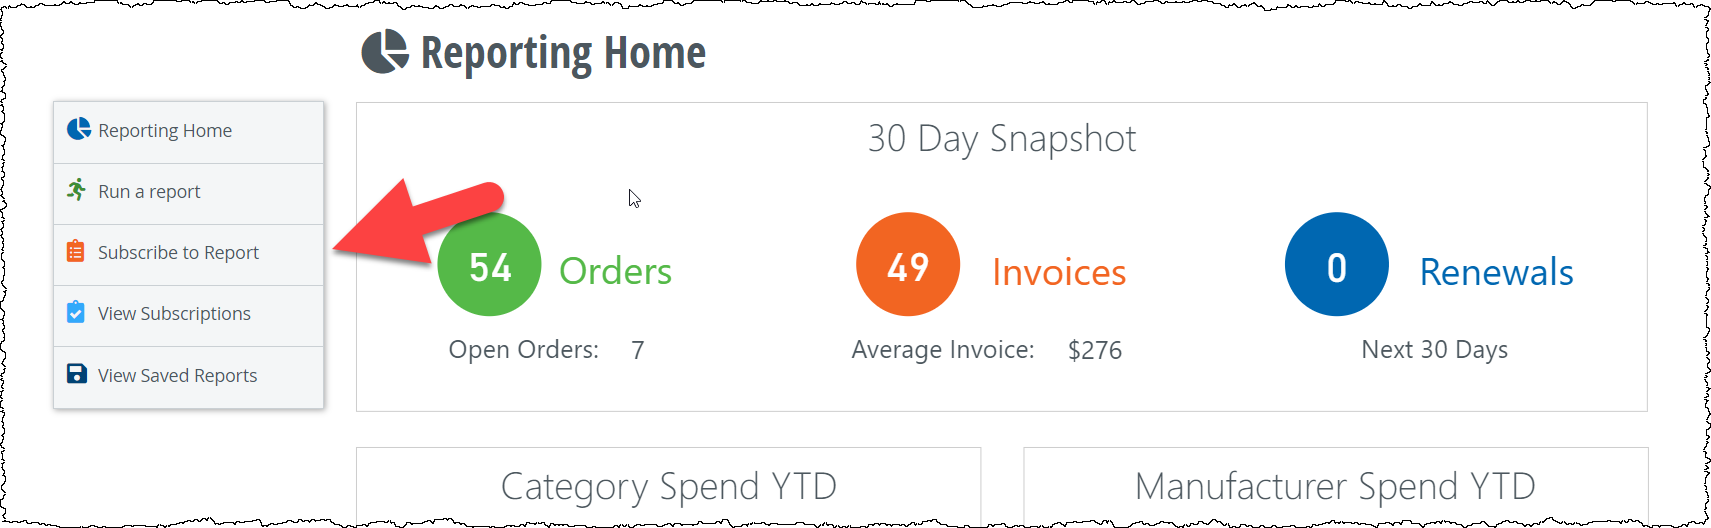
Reporting
1
Navigate to SHI.com, click Sign In in the top right corner, and sign into your account.
2
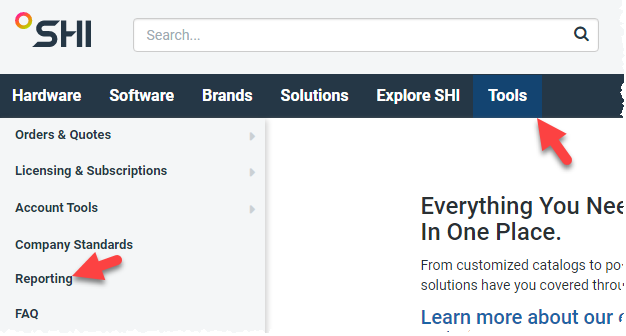
In the top navigation bar hover or click on Tools, then click on Reporting.
3
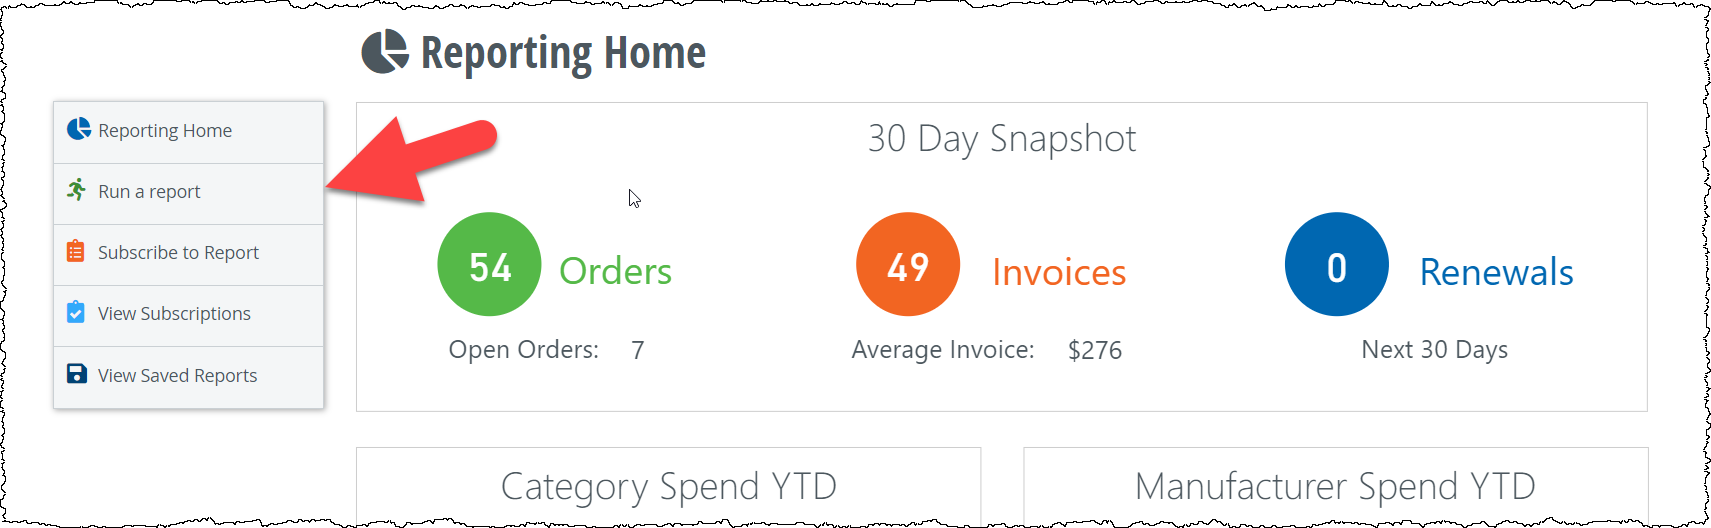
On the Reporting homepage, select Run a report from the menu on the left.
4
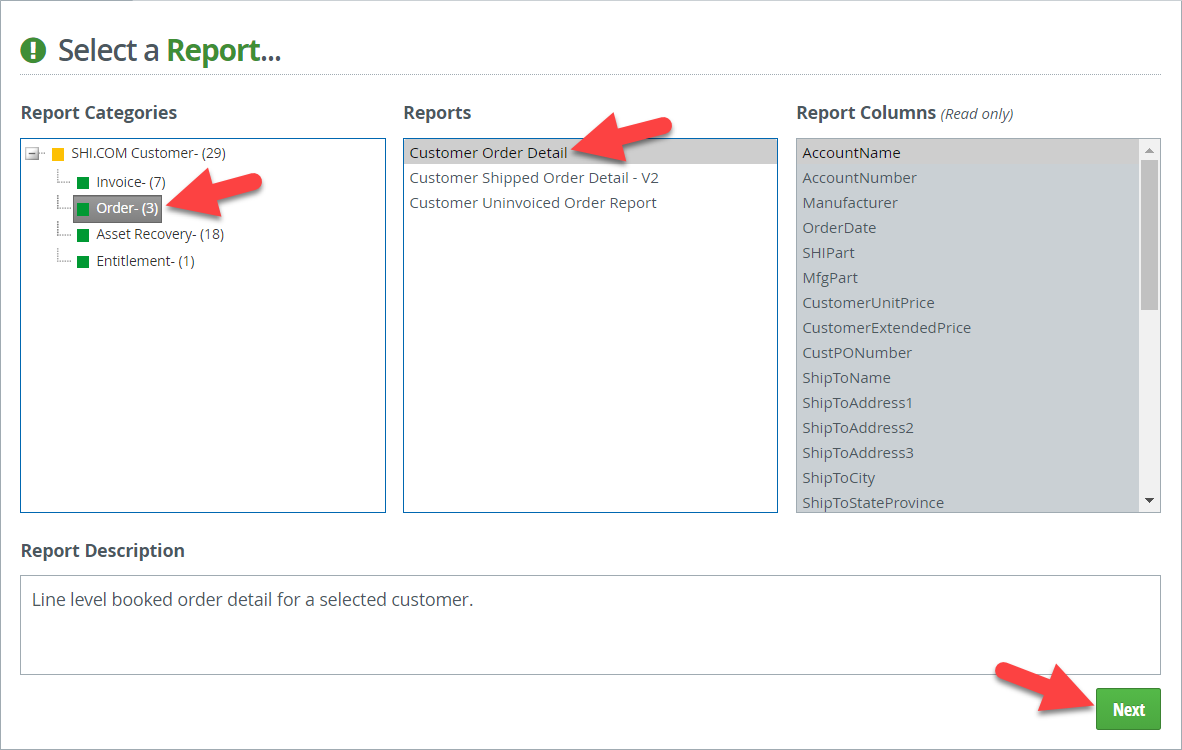
First, select a Report Category from the first column. Then, select a Report from the second column. The third column informs you what columns are included in the report. Finally, click the Next button to proceed.
5
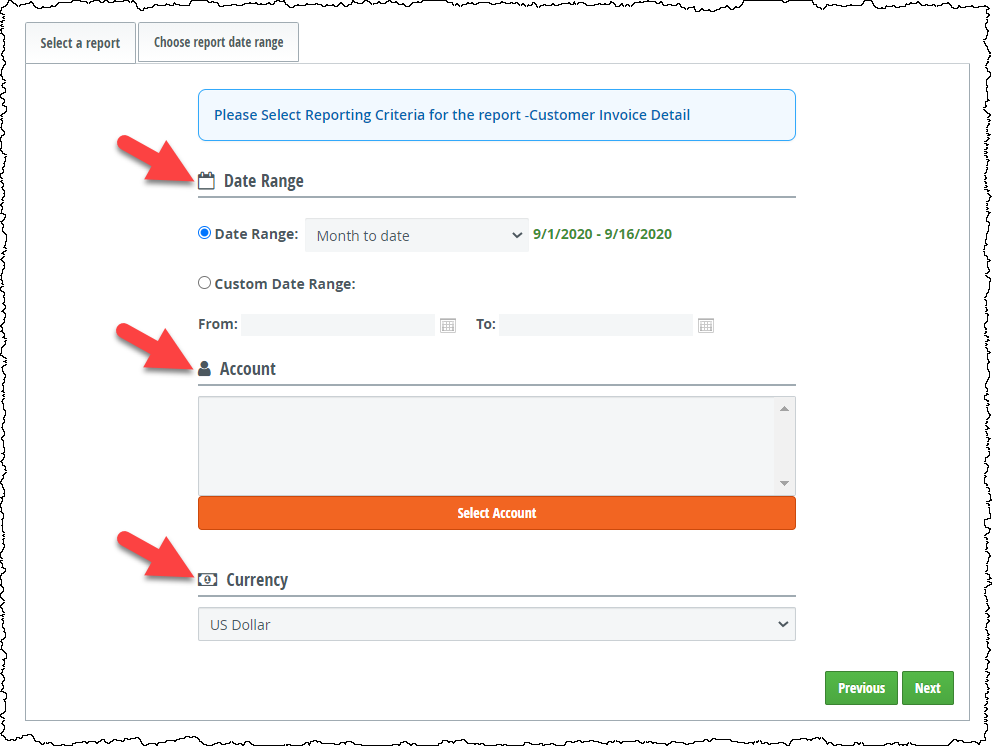
In this example, we must define a Date Range, Account, and Currency for the report.
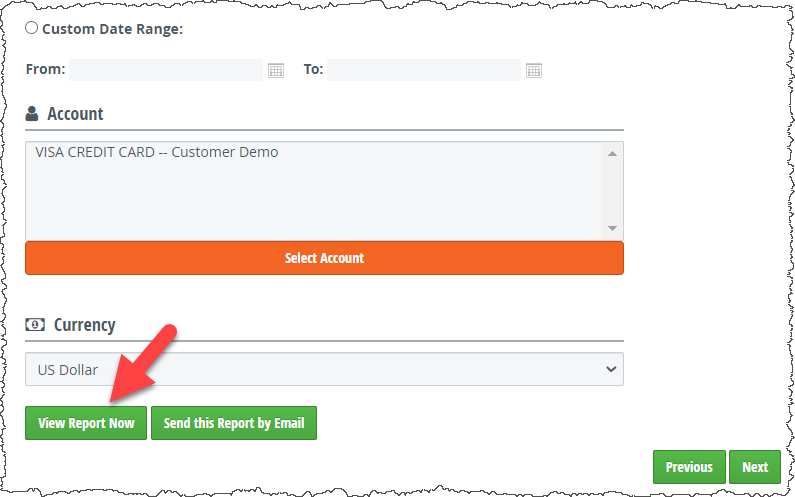
6
You now have 3 different options on how to proceed with your report. You can:
Click the View Report Now button to view the report in your browser OR…
Click the Send this Report by Email to email the report to yourself (and others) OR…
Click Next to continue customizing the report.
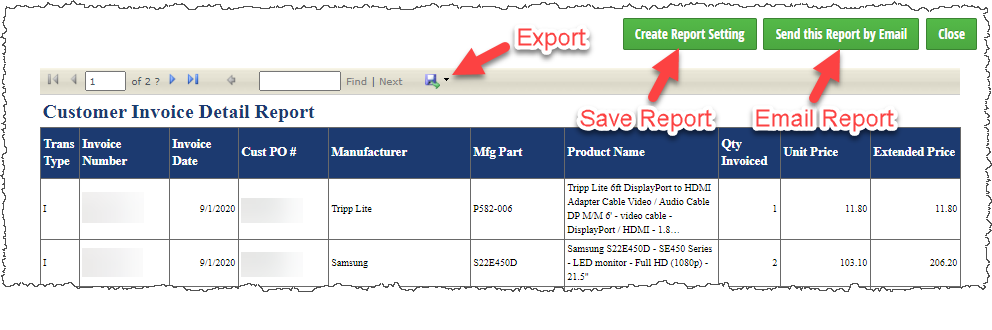
7
Clicking “View Report Now” on step 6 will show you the report in your browser. From this page you can also export, save, or email the report.
1
Navigate to SHI.com, click Sign In in the top right corner, and sign into your account.
2
In the top navigation bar hover or click on Tools, then click on Reporting.
3
On the Reporting homepage, select Subscribe to Report from the menu on the left.
4
First, select a Report Category from the first column. Then, select a Report from the second column. The third column informs you what columns are included in the report. Finally, click the Next button to proceed.
5
On this step you need to select from a number of options depending on the report you selected. In this example, we must define a Date Range, Account, and Currency for the report.
6
Next, click the Subscription button at the bottom of the page.
7
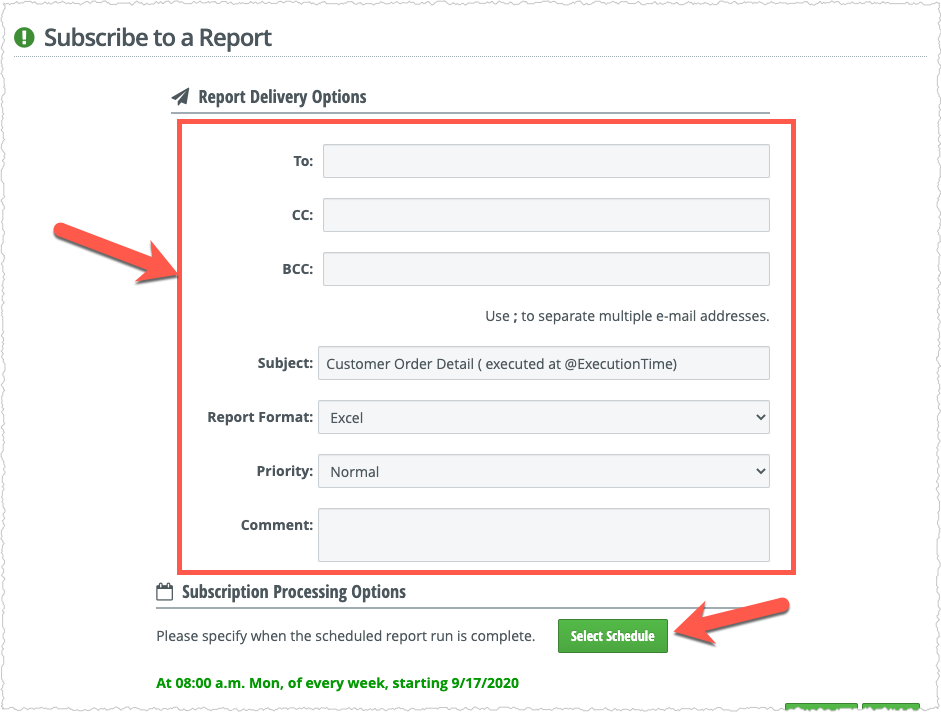
Fill out the relevant fields for the subscription and then click Select Schedule to determine when you will receive the report. By default, the report will be sent
weekly at 8AM on Monday unless you change it.
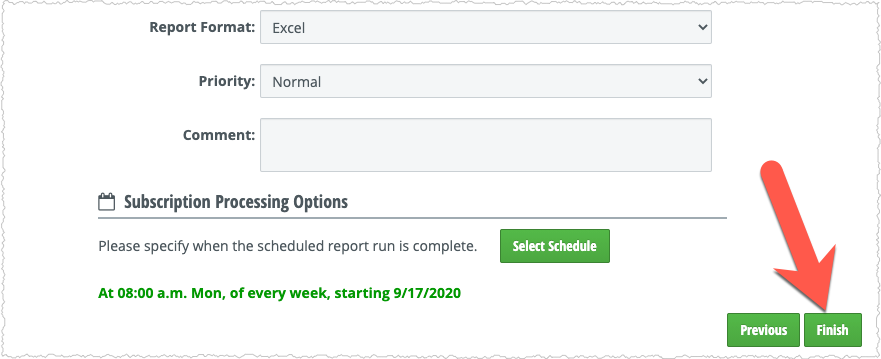
8
Finally, click the Finish button when you have finished configuring the subscription settings. You have now subscribed to the report. You can edit or remove any
subscriptions by selecting View Subscriptions from the Reporting navigation on the left.
 Your browser is no longer supported